hello.
it is just some configuration file for backup.
never mind it.
FSTAB example
SMB example
VSFTPD example
Showing posts with label Linux. Show all posts
Showing posts with label Linux. Show all posts
2019/11/24
2019/09/26
iPadOS weird SMB share permission error
Hello! good day!
today, I have upgrade my iPad to 'iPadOS 13'.
I had wondered if File-App works SMB share feature properly.
I have small NAS using Raspberry-Pi that attached USB memory sticks. so I tested.
first, connection was just good. but, problem is after.
iPad reject to read and write file. just file browsing allowd.
but my Macbook and Windows notebook were no problem to read and write file.
it's so weird situation.
so I thought that NAS has problem.
I tried to find cause. and figured out something strange.
MacOS and Windows are writing file on SMB share as root qualification. and also my USB sticks as formatted exFAT are mounted as root:root ownership and 777 permission.
I suspected that this is the point to solve the problem.
and I tried to change the folder and files ownership and permission, but I could not give them ownership and permission properly. exactly, I tried to change ownership from root:root to nobody:nogroup. but this try was rejected by system.
I thought that this is the not just simple problem to change ownership and permission. maybe this problem came from it's file system.
finally, I tried to change the file system of USB sticks by formatting.
after changing the USB sticks file system to Ext4, my iPad could read and write file on SMB share properly.
conclusion is that iPadOS is write file as nobody:nogroup ownership on SMB share. and exFAT file system is just removable and temporary file system. so, do not use the exFAT for SMB service. Ext4 is highly recommend.
so, if your iPad File-App could not access the SMB share properly, check the disk format type.
2019/07/19
read-only NTFS disk mount on Linux
recently, I suffered because of NTFS disk mounting.
after searching several advices, I found a reliable solution.
the problem is Windows fast startup option. turn off fast startup option.
reference page is here.
https://www.linuxuprising.com/2019/01/fix-windows-10-or-8-partition-mounted.html
Fix Windows 10 Or 8 Partition Mounted As Read-Only On Linux When Dual Booting
good luck!
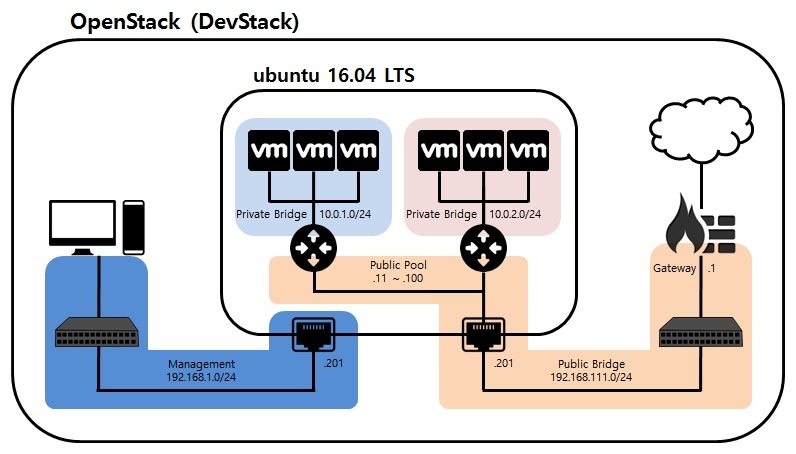
OpenStack Network Topology
Hello
If you wanna install OpenStack(DevStack) on your Server for Test, refer this network topology.
Public Network Pool : 192.168.111.0/24
Private Network Pool 1 : 10.0.1.0/24
Private Network Pool 2(added later) : 10.0.2.0/24
Management Network Pool : 192.168.1.0/24
I had installed the ubuntu on VMware ESXi.
This ubuntu server has 2 NIC ports. one has assigned for management, the other one has assigned for public(router and floating).
and configured promiscuous mode on public bridge. (refer previous post.)

and addition, I attach configuration for setup.
1. useradd -U -G sudo -s /bin/bash -m stack
2. echo "stack ALL=(ALL) NOPASSWD:ALL" >> /etc/sudoers
3. passwd stack
4. su stack
5. cd
6. git clone https://git.openstack.org/openstack-dev/devstack
7. cd devstack
8. make new "local.conf" file for installation and paste refer this example.
[local.conf]==============================================
[[local|localrc]]
HOST_IP=192.168.1.201
SERVICE_HOST=192.168.1.201
MYSQL_HOST=192.168.1.201
RABBIT_HOST=192.168.1.201
GLANCE_HOSTPORT=192.168.1.201:9292
ADMIN_PASSWORD=PASSWORD
DATABASE_PASSWORD=PASSWORD
RABBIT_PASSWORD=PASSWORD
SERVICE_PASSWORD=PASSWORD
# Do not use Nova-Network
disable_service n-net
# Enable Neutron
ENABLED_SERVICES+=,q-svc,q-dhcp,q-meta,q-agt,q-l3
## Neutron options
Q_USE_SECGROUP=True
FLOATING_RANGE="192.168.111.0/24"
FIXED_RANGE="10.0.1.0/24"
Q_FLOATING_ALLOCATION_POOL=start=192.168.111.11,end=192.168.111.100
PUBLIC_NETWORK_GATEWAY="192.168.111.1"
PUBLIC_INTERFACE=ens192
# Open vSwitch provider networking configuration
Q_USE_PROVIDERNET_FOR_PUBLIC=True
OVS_PHYSICAL_BRIDGE=br-ex
PUBLIC_BRIDGE=br-ex
OVS_BRIDGE_MAPPINGS=public:br-ex
=====================================================
9. ./stack.sh
10. after installing DevStack, login to IP address assigned using web browser.
I had tried to install DevStack several times, It's not easy to install successful.
DevStack is developing day by day, so there is unpredictable bugs.
Good luck!
If you wanna install OpenStack(DevStack) on your Server for Test, refer this network topology.
Public Network Pool : 192.168.111.0/24
Private Network Pool 1 : 10.0.1.0/24
Private Network Pool 2(added later) : 10.0.2.0/24
Management Network Pool : 192.168.1.0/24
I had installed the ubuntu on VMware ESXi.
This ubuntu server has 2 NIC ports. one has assigned for management, the other one has assigned for public(router and floating).
and configured promiscuous mode on public bridge. (refer previous post.)
and addition, I attach configuration for setup.
1. useradd -U -G sudo -s /bin/bash -m stack
2. echo "stack ALL=(ALL) NOPASSWD:ALL" >> /etc/sudoers
3. passwd stack
4. su stack
5. cd
6. git clone https://git.openstack.org/openstack-dev/devstack
7. cd devstack
8. make new "local.conf" file for installation and paste refer this example.
[local.conf]==============================================
[[local|localrc]]
HOST_IP=192.168.1.201
SERVICE_HOST=192.168.1.201
MYSQL_HOST=192.168.1.201
RABBIT_HOST=192.168.1.201
GLANCE_HOSTPORT=192.168.1.201:9292
ADMIN_PASSWORD=PASSWORD
DATABASE_PASSWORD=PASSWORD
RABBIT_PASSWORD=PASSWORD
SERVICE_PASSWORD=PASSWORD
# Do not use Nova-Network
disable_service n-net
# Enable Neutron
ENABLED_SERVICES+=,q-svc,q-dhcp,q-meta,q-agt,q-l3
## Neutron options
Q_USE_SECGROUP=True
FLOATING_RANGE="192.168.111.0/24"
FIXED_RANGE="10.0.1.0/24"
Q_FLOATING_ALLOCATION_POOL=start=192.168.111.11,end=192.168.111.100
PUBLIC_NETWORK_GATEWAY="192.168.111.1"
PUBLIC_INTERFACE=ens192
# Open vSwitch provider networking configuration
Q_USE_PROVIDERNET_FOR_PUBLIC=True
OVS_PHYSICAL_BRIDGE=br-ex
PUBLIC_BRIDGE=br-ex
OVS_BRIDGE_MAPPINGS=public:br-ex
=====================================================
9. ./stack.sh
10. after installing DevStack, login to IP address assigned using web browser.
I had tried to install DevStack several times, It's not easy to install successful.
DevStack is developing day by day, so there is unpredictable bugs.
Good luck!
FreeRADIUS installation
If you need to test RADIUS, this video is very very helpful!
[Configuration Examlple]
root@test:/etc/freeradius# nano users
user1 Cleartext-Password := "password"
user2 Cleartext-Password := "password"
user3 Cleartext-Password := "password"
root@test:/etc/freeradius# nano clients.conf
# Cisco Type Device
client 0.0.0.0/0 {
secret=cisco
shortname=cisco
nastype=cisco
}
Reference Video
https://youtu.be/0rFA3ZLoXUQ
regards.
Wireshark additional configuration after installing
If you face the problem to run wireshark after just installing.
this configuration will be helpful.
sudo groupadd wireshark
sudo usermod -a -G wireshark YOUR_USER_NAME
sudo chgrp wireshark /usr/bin/dumpcap
sudo chmod 750 /usr/bin/dumpcap
sudo setcap cap_net_raw,cap_net_admin=eip /usr/bin/dumpcap
sudo getcap /usr/bin/dumpcap
Good luck!
this configuration will be helpful.
sudo groupadd wireshark
sudo usermod -a -G wireshark YOUR_USER_NAME
sudo chgrp wireshark /usr/bin/dumpcap
sudo chmod 750 /usr/bin/dumpcap
sudo setcap cap_net_raw,cap_net_admin=eip /usr/bin/dumpcap
sudo getcap /usr/bin/dumpcap
Good luck!
TFTP Server Install and Setup
Install following packages.
#sudo apt-get install xinetd tftpd tftp
Create /etc/xinetd.d/tftp and put this entry
service tftp
{
protocol = udp
port = 69
socket_type = dgram
wait = yes
user = nobody
server = /usr/sbin/in.tftpd
server_args = /tftpboot
disable = no
}
Create a folder /tftpboot this should match whatever you gave in server_args. mostly it will be tftpboot
#sudo mkdir /tftpboot
#sudo chmod -R 777 /tftpboot
#sudo chown -R nobody /tftpboot
Restart the xinetd service.
new systems:
#sudo service xinetd restart
old systems:
#sudo /etc/init.d/xinetd restart
Testing our tftp server
Create a file named test with some content in /tftpboot path of the tftp server
Obtain the ip address of the tftp server using ifconfig command
Now in some other system follow the following steps.
#tftp 192.168.1.2
tftp> get test
Sent 159 bytes in 0.0 seconds
tftp> quit
cat test
Reference page
http://askubuntu.com/questions/201505/how-do-i-install-and-run-a-tftp-server
Ubuntu public DNS configuration sample
Hello!
if you deploying public DNS server at Ubuntu linux, you should refer this sample configurations.
public DNS server need to update its records to upper DNS server.
configuration file located /etc/bind/named.conf.options
================================================================================
ubuntu@ip-172-31-16-49:/etc/bind$ cat named.conf.options
options {
directory "/var/cache/bind";
// If there is a firewall between you and nameservers you want
// to talk to, you may need to fix the firewall to allow multiple
// ports to talk. See http://www.kb.cert.org/vuls/id/800113
// If your ISP provided one or more IP addresses for stable
// nameservers, you probably want to use them as forwarders.
// Uncomment the following block, and insert the addresses replacing
// the all-0's placeholder.
recursion yes;
allow-query { any; };
forwarders {
8.8.8.8;
8.8.4.4;
};
forward only;
//========================================================================
// If BIND logs error messages about the root key being expired,
// you will need to update your keys. See https://www.isc.org/bind-keys
//========================================================================
dnssec-enable yes;
dnssec-validation yes;
auth-nxdomain no; # conform to RFC1035
listen-on-v6 { any; };
};
================================================================================
Ubuntu Public DNS Server Configuration Sample.zip
Good luck!
x11vnc install and configuration at Ubuntu
Hello.
Ubuntu 15.04 above, to install x11vnc and configuration follow this.
[[Run the following to install]]
#sudo apt-get install x11vnc
#sudo x11vnc -storepasswd yourVNCpasswordHERE /etc/x11vnc.pass
[[Insert this into the file]]
#sudo nano /lib/systemd/system/x11vnc.service
[Unit]
Description="x11vnc"
Requires=display-manager.service
After=display-manager.service
[Service]
ExecStart=/usr/bin/x11vnc -xkb -loop -noxrecord -noxfixes -noxdamage -display :0 -auth guess -rfbauth /etc/x11vnc.pass
ExecStop=/usr/bin/killall x11vnc
[Install]
WantedBy=multi-user.target
[[Then, start with]]
#sudo systemctl daemon-reload
#sudo systemctl start x11vnc
[[And ensure the service starts on boot]]
#sudo systemctl enable x11vnc
Ubuntu 15.04 below, to install x11vnc and configuration follow this.
[[Run the following to install]]
#sudo apt-get install x11vnc
#sudo x11vnc -storepasswd yourVNCpasswordHERE /etc/x11vnc.pass
[Add this line to the file]]
#sudo nano /etc/init/x11vnc.conf
start on login-session-start
script
/usr/bin/x11vnc -xkb -loop -forever -auth /var/run/lightdm/root/:0 -display :0 -rfbauth /etc/x11vnc.pass -rfbport 5900 -bg -o /var/log/x11vnc.log
end script
[[Then, start with]]
#sudo service x11vnc restart
Reference
http://askubuntu.com/questions/229989/how-to-setup-x11vnc-to-access-with-graphical-login-screen
Good luck!
VSFTPD install and configuration
Hello!
today, I retried to install the VSFTPD daemon.
yesterday, I had suffered some bugs and misconfiguration.
but I did it!
[/etc/vsftpd.conf]=====================================================
listen=YES
local_enable=YES
write_enable=YES
local_umask=022
anonymous_enable=YES
anon_root=/storage
anon_upload_enable=YES
anon_mkdir_write_enable=YES
anon_other_write_enable=YES
anon_umask=022
chroot_local_user=YES
allow_writable_chroot=YES
======================================================================
and then restart VSFTPD daemon!
of course, Ubuntu doesn't need to set SELiunx security enforcement.
if you use CentOS, you should fix SELinux security configuration.
[CentOS SELinux Configuration]========================================
[root@localhost test]# getsebool -a | grep ftp
ftp_home_dir --> off
ftpd_anon_write --> off
ftpd_connect_all_unreserved --> off
ftpd_connect_db --> off
ftpd_full_access --> off
ftpd_use_cifs --> off
ftpd_use_fusefs --> off
ftpd_use_nfs --> off
ftpd_use_passive_mode --> off
httpd_can_connect_ftp --> off
httpd_enable_ftp_server --> off
sftpd_anon_write --> off
sftpd_enable_homedirs --> off
sftpd_full_access --> off
sftpd_write_ssh_home --> off
tftp_anon_write --> off
tftp_home_dir --> off
[root@localhost test]# setsebool -P ftp_home_dir on
[root@localhost test]# setsebool -P ftpd_full_access on
[root@localhost test]# setsebool -P ftpd_anon_write on
======================================================================
and, you MUST set permission 755 and owner root:root for shared directory.
CentOS VSFTPD Configuration.txt
CentOS VSFTPD SELinux Configuration.txt
Ubuntu VSFTPD Configuration.txt
Good luck!
BIND9 SRV Record setup
Hello!
If you need to set SIP calling service, you should set up DNS SRV Records.
You can set DNS SRV Reords like below at Linux BIND9 service.
_cisco-uds._tcp.test.net. 86400 IN SRV 10 10 8443 cucm.test.net.
_cuplogin._tcp.test.net. 86400 IN SRV 10 10 8443 cup.test.net.
BIND9 SRV Record.zip
If you need to set SIP calling service, you should set up DNS SRV Records.
You can set DNS SRV Reords like below at Linux BIND9 service.
_cisco-uds._tcp.test.net. 86400 IN SRV 10 10 8443 cucm.test.net.
_cuplogin._tcp.test.net. 86400 IN SRV 10 10 8443 cup.test.net.
BIND9 SRV Record.zip
Ubuntu NTP Server Configuration Example
Ubuntu NTP Server Configuration Example
=========================================================================
root@test:/etc# cat ntp.conf
# /etc/ntp.conf, configuration for ntpd; see ntp.conf(5) for help
driftfile /var/lib/ntp/ntp.drift
# Enable this if you want statistics to be logged.
#statsdir /var/log/ntpstats/
statistics loopstats peerstats clockstats
filegen loopstats file loopstats type day enable
filegen peerstats file peerstats type day enable
filegen clockstats file clockstats type day enable
# Specify one or more NTP servers.
# Use servers from the NTP Pool Project. Approved by Ubuntu Technical Board
# on 2011-02-08 (LP: #104525). See http://www.pool.ntp.org/join.html for
# more information.
#server 0.ubuntu.pool.ntp.org
#server 1.ubuntu.pool.ntp.org
#server 2.ubuntu.pool.ntp.org
#server 3.ubuntu.pool.ntp.org
server 127.127.1.0 # Local NTP Address
fudge 127.127.1.0 stratum 10 # NTP Stratum Priority
# Use Ubuntu's ntp server as a fallback.
#server ntp.ubuntu.com
# Access control configuration; see /usr/share/doc/ntp-doc/html/accopt.html for
# details. The web page <http://support.ntp.org/bin/view/Support/AccessRestrictions>
# might also be helpful.
#
# Note that "restrict" applies to both servers and clients, so a configuration
# that might be intended to block requests from certain clients could also end
# up blocking replies from your own upstream servers.
# By default, exchange time with everybody, but don't allow configuration.
restrict -4 default kod notrap nomodify nopeer noquery
restrict -6 default kod notrap nomodify nopeer noquery
# Local users may interrogate the ntp server more closely.
restrict 127.0.0.1
restrict ::1
# Clients from this (example!) subnet have unlimited access, but only if
# cryptographically authenticated.
#restrict 192.168.123.0 mask 255.255.255.0 notrust
#restrict 192.168.0.0 mask 255.255.255.0 nomodify notrap # Permit Local Subnet
# If you want to provide time to your local subnet, change the next line.
# (Again, the address is an example only.)
#broadcast 192.168.123.255
# If you want to listen to time broadcasts on your local subnet, de-comment the
# next lines. Please do this only if you trust everybody on the network!
#disable auth
#broadcastclient
=========================================================================
=========================================================================
root@test:/etc# cat ntp.conf
# /etc/ntp.conf, configuration for ntpd; see ntp.conf(5) for help
driftfile /var/lib/ntp/ntp.drift
# Enable this if you want statistics to be logged.
#statsdir /var/log/ntpstats/
statistics loopstats peerstats clockstats
filegen loopstats file loopstats type day enable
filegen peerstats file peerstats type day enable
filegen clockstats file clockstats type day enable
# Specify one or more NTP servers.
# Use servers from the NTP Pool Project. Approved by Ubuntu Technical Board
# on 2011-02-08 (LP: #104525). See http://www.pool.ntp.org/join.html for
# more information.
#server 0.ubuntu.pool.ntp.org
#server 1.ubuntu.pool.ntp.org
#server 2.ubuntu.pool.ntp.org
#server 3.ubuntu.pool.ntp.org
server 127.127.1.0 # Local NTP Address
fudge 127.127.1.0 stratum 10 # NTP Stratum Priority
# Use Ubuntu's ntp server as a fallback.
#server ntp.ubuntu.com
# Access control configuration; see /usr/share/doc/ntp-doc/html/accopt.html for
# details. The web page <http://support.ntp.org/bin/view/Support/AccessRestrictions>
# might also be helpful.
#
# Note that "restrict" applies to both servers and clients, so a configuration
# that might be intended to block requests from certain clients could also end
# up blocking replies from your own upstream servers.
# By default, exchange time with everybody, but don't allow configuration.
restrict -4 default kod notrap nomodify nopeer noquery
restrict -6 default kod notrap nomodify nopeer noquery
# Local users may interrogate the ntp server more closely.
restrict 127.0.0.1
restrict ::1
# Clients from this (example!) subnet have unlimited access, but only if
# cryptographically authenticated.
#restrict 192.168.123.0 mask 255.255.255.0 notrust
#restrict 192.168.0.0 mask 255.255.255.0 nomodify notrap # Permit Local Subnet
# If you want to provide time to your local subnet, change the next line.
# (Again, the address is an example only.)
#broadcast 192.168.123.255
# If you want to listen to time broadcasts on your local subnet, de-comment the
# next lines. Please do this only if you trust everybody on the network!
#disable auth
#broadcastclient
=========================================================================
Pure-ftpd install and setup at Ubuntu
Pure-ftpd install and setup at Ubuntu
# sudo apt-get install pure-ftpd # install
# echo "cp949" | tee /etc/pure-ftpd/conf/ClientCharset # set character set(each country)
# echo "yes" | tee /etc/pure-ftpd/conf/BrokenClientsCompatibility # ignore standard for interoperable.
# echo "yes" | tee /etc/pure-ftpd/conf/DontResolve # logging using IP
# echo "yes" | tee /etc/pure-ftpd/conf/ChrootEveryone # show just own home
# echo "no" | tee /etc/pure-ftpd/conf/NoAnonymous # anonymous user accept
# useradd ftp # make anonymous user
# mkdir /home/ftp # make anonymous user directory
# chown ftp.ftp /home/ftp # change authority owner as ftp
# /etc/init.d/pure-ftpd restart # restart daemon
If you want to change the home directory, edit the "/etc/passwd" file.
anonymous user can upload files, but can not delete files.
XRDP at Ubuntu
XRDP at Ubuntu
install xrdp daemon
# apt-get install xrdp # install xrdp
If you couldn't see Gnome menu, you should install Gnome 2D.(after version 12.)
# apt-get install gnome-session-fallback # install gnome-session-fallback
# gedit /home/user/.xsession # make xsession file at login user's home directory
gnome-session --session=gnome-fallback # add this line
# service xrdp restart # restart xrdp
I think It's not enough.
X11VNC Server and TigerVNC is better solution.
Caution command at Ubuntu
Many people knows, restarting network service command is like this.
but, this command is not recommended at Ubuntu linux.
If you don't want to meet stopped iron.
#service networking restart
#/etc/init.d/networking restart
I recommend this command.
#service network-manager restart
Also you'll meet this command.
#halt
I recommand this command.
#shutdown -h now
It's little strange. It's no problem at CentOS.
Why normal command occuring issue at Ubuntu?
BIND9 DNS Server setup at Ubuntu
Today, I'm going to build DNS service using BIND9 at Ubuntu.
As you know, BIND9 is so famous DNS service daemon.
and It also famous it's strict grammer. sometimes disgusting to setup.
First of all setup service.
#apt-get install bind9
Files to setup is on "/etc, /etc/bind/" directory.
[hosts]==================================================================================
192.168.0.60 webextest.com apple # Host server IP address, domain, name
[resolv.conf]=============================================================================
nameserver 192.168.0.60 # Name server's IP address
[named.conf]=============================================================================
zone "webextest.com" { # Inverse zone domain
type master;
file "/etc/bind/webextest.zone"; # File name is anything good.
};
zone "0.168.192.in-addr.arpa" { # Reverse zone domain(192.168.0 input reverse)
type master;
file "/etc/bind/webextest.rev"; # File name is anything good.
};
[inverse zone]===========================================================================
$TTL 604800
@ IN SOA webextest.com. root.webextest.com. ( # End of the domain, you MUST input "."
1111 ; Serial # Input the number not duplicate.
604800 ; Refresh
86400 ; Retry
2419200 ; Expire
604800 ) ; Negative Cache TTL
;
@ IN NS webextest.com. # Domain name
@ IN A 192.168.0.60 # Host server address
www IN A 192.168.0.60 # Web server address
[reverse zone]===========================================================================
$TTL 604800
@ IN SOA webextest.com. root.webextest.com. ( # End of the domain, you MUST input "."
2222 ; Serial # Input the number not duplicate.
604800 ; Refresh
86400 ; Retry
2419200 ; Expire
604800 ) ; Negative Cache TTL
;
@ IN NS webextest.com. # Domain name
@ IN A 192.168.0.60 # Host server address
60 IN PTR webextest.com. # input last octet of IP address
========================================================================================
After setup, restart service.
#service bind9 restart
now, check the DNS service.
#nslookup webextest.com
#nslookup 192.168.0.60
and then, check the zone file
#named-checkzone webextest.com webextest.zone
If grammer is correct, you can see OK sign.
Example file is here. refer to this example files.
BIND9 Setup.zip
BIND9 Setup 2.zip
It looks like simple, but It's too strict to setup.
maybe you will meet error message at least one time.
Good luck!
Subscribe to:
Posts (Atom)